Getting Started
Getting started with Capture Core
From install to your first screenshot
Capture Core is a screenshot app for Windows. Capturing, annotating and organising all happen in one place, which is the point of it — but there is a lot in there, and it is not obvious where to start. This page walks through installing it and getting your first screenshot saved. Everything described here works in the free edition.
1. Before you start: switching the app to English
The app is available in English (since v1.1.2). It starts in Japanese the first time you run it. To switch: open Settings (設定) → find 言語 / Language → pick English. The change applies immediately — no restart needed.
Until you switch, this guide puts the Japanese label next to every place you need to click, like Settings (設定) or Hotkeys (ホットキー). The screenshots on this page still show the Japanese interface; we are retaking them in English.
2. Installing
Get the installer from the download page. It is about 17MB. Double-click the downloaded Capture Core_x.y.z_x64-setup.exe and follow the installer — there are no choices you need to think hard about.
Worth saying up front: the app has not been downloaded by many people yet, so your browser and Windows may ask you to confirm during download and on first run. Neither is a virus detection, and you can continue past both. The download page has the exact click path for Edge and for the SmartScreen screen.
Once it finishes, Capture Core appears in the notification area (the system tray, bottom right). It runs in the background, so closing the main window does not stop it capturing. For as long as your PC is on, it is one keypress away.
3. Your first screenshot
Press PrintScreen. The screen dims slightly and you are in region-select mode.
Two things work here. Drag with the mouse and you get that rectangle. Click on a window without dragging and you get the whole window — as you move the pointer, the window under it is outlined, so you can see what you are about to get. Esc backs out at any time.
After the shot, a small thumbnail pops up in the corner of the screen. That is your confirmation. First one done — it should not have taken ten seconds.
If pressing PrintScreen does nothing, Windows 11 has claimed the key. See Common snags.
4. Capture modes and default keys
There is more than one way to take a shot. These are the ones that come up day to day, with the keys they are bound to out of the box.
| Mode | Default key | Good for |
|---|---|---|
| Region範囲キャプチャ | PrintScreen | Grab part of the screen. The one you will use most |
| Windowウィンドウキャプチャ | Alt + PrintScreen | A whole application window in one shot |
| Full screen全画面キャプチャ | Ctrl + Shift + Alt + PrintScreen | The entire desktop, including multiple monitors |
| Same region again前回と同じ範囲 | Ctrl + PrintScreen | Shooting the same spot repeatedly — handy for step-by-step docs |
| Scrolling captureスクロールキャプチャ | Shift + PrintScreen | A long page stitched into a single tall image |
| OCR文字認識(OCR) | Ctrl + Shift + PrintScreen | Pull the text out of the selected area |
Every key can be changed under Settings (設定) → Hotkeys (ホットキー). Pressing F1 while the app is running opens the shortcut list, and you can reassign keys directly from there.
One small trick while selecting a region: hold Shift while dragging and the selection is kept inside the window you started in. It stops the usual mistake of wanting just the browser window and catching a strip of whatever is behind it.
5. Right after you capture
The editor does not open on every shot. Most screenshots are “paste it into chat and move on” or “glance at it and bin it”, and opening an editor for those is in the way.
The thumbnail that appears in the corner can be dragged straight into a chat window or an email. When you do need to annotate, you go into the editor from there. That “shoot it and throw it” speed is the part we fussed over most.
For longer sessions there is the quick tray, which stacks your captures at the edge of the screen so you can save, copy, discard or edit them in a batch later. Take twenty shots while reading through a document, then keep the three you actually need.
6. Arrows, masks and other edits
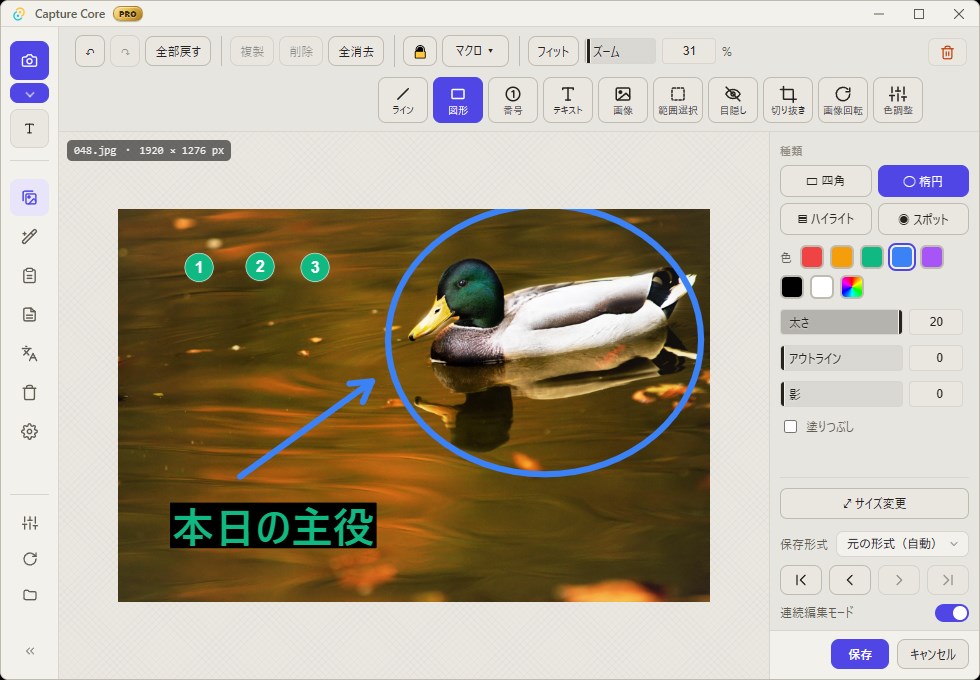
Choosing edit from the thumbnail or the quick tray opens the editor. The tools you reach for most are along the top:
- Arrow (矢印) · Shape (図形) · Highlight (ハイライト) — the basic “look at this” tools
- Number (番号) — drops ①②③ badges in sequence as you click. For step-by-step instructions
- Text (テキスト) — a written note on the image
- Mask (マスク) — hide what should not be seen, with blur, mosaic or a solid block. This is your tool for personal information that wandered into the shot
Cropping (切り抜き), resizing, rotation (画像回転) and color adjustment (色調整) are all in the same window. Save with Ctrl+S. The free edition never puts a watermark on a saved image. That is a product decision, and worth stating plainly.
7. Where files go
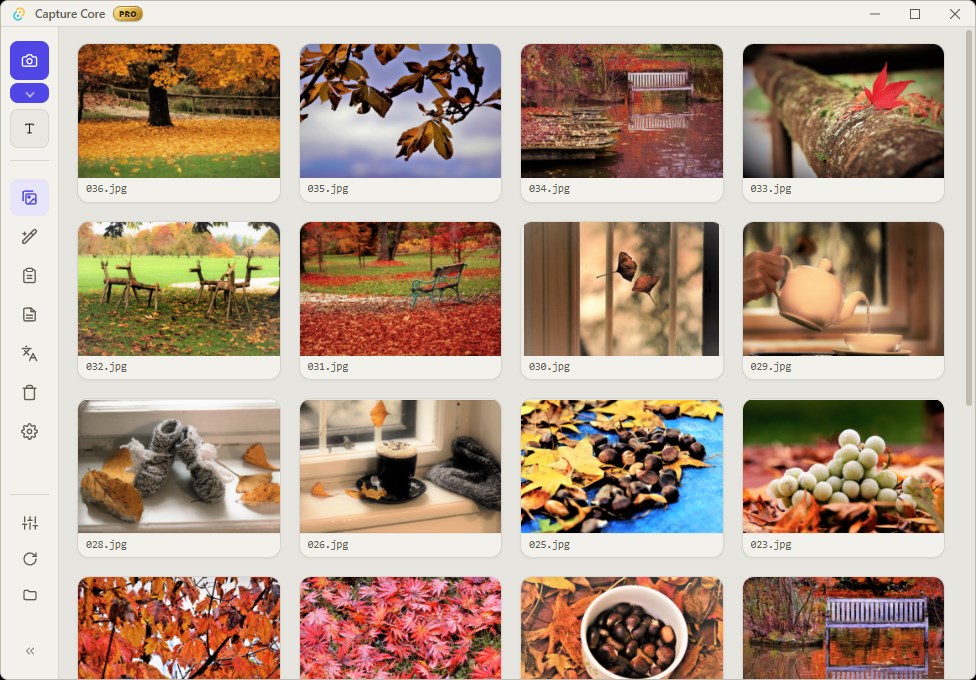
Saved images go to Pictures\Capture Core by default. They are not locked inside a database — it is an ordinary Windows folder, visible in Explorer, and if you ever stop using the app your images simply stay where they are.
The library view inside the app sorts by date or size and moves or deletes files in bulk. Deletions go through the Windows Recycle Bin, so an accidental one is recoverable.
8. Settings worth doing first
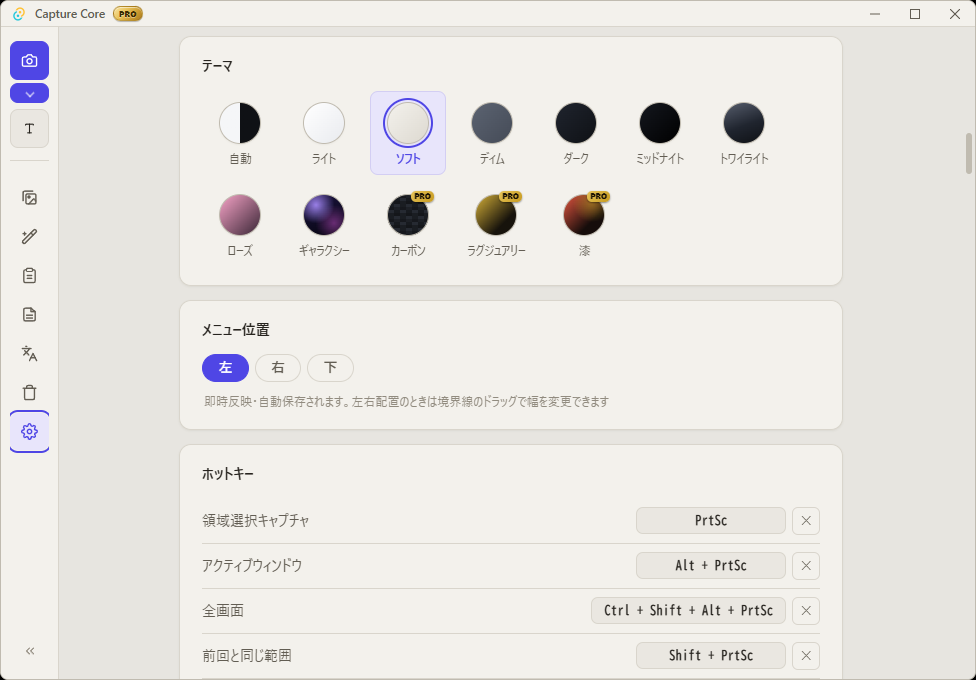
The defaults are meant to be usable as they are, but opening Settings (設定) once and adjusting these three will save you friction later:
- Save folder — 保存先フォルダ. Whether the default under Pictures suits you, or work should go to another drive
- Hotkeys — ホットキー. If another background app has claimed a key, the settings screen flags the clash. Move it to something comfortable
- Theme — テーマ. Several color schemes including light and dark, plus an automatic mode that follows Windows
One more thing worth knowing: slide the mouse into the edge of the screen and a fan-shaped launcher opens — Edge launcher (画面端ランチャー) in the settings — giving you the capture modes and tools without the keyboard. It works over full-screen video too, so if you are mouse-first, start there.
9. Common snags
Edge says the installer “isn’t commonly downloaded”
That is an automatic notice Microsoft Edge shows for files that have not been downloaded by many people yet. It is not a virus detection. Hover over the item in the downloads list, open the “…” menu and choose “Keep”, then “Show more” → “Keep anyway”. The installer is distributed only from the official site (piftoworks.com).
Windows says “Windows protected your PC” when I run the installer
That is SmartScreen, and again it is not a virus detection. Capture Core is signed with a code-signing certificate, but until Windows builds up a reputation for the app this screen can still appear. Click “More info” and the “Run anyway” button appears.
Nothing happens when I press PrintScreen
Windows 11 assigns the PrintScreen key to its own Snipping Tool by default, which can stop other apps from receiving it. Capture Core tries to free the key once on first launch. If that did not work, turn on the PrintScreen priority option in Settings (設定), or assign a different key under Hotkeys (ホットキー).
My screenshot came out black
Protected content from streaming services such as Netflix is captured as black by every screenshot app — that is enforced by the OS and cannot be worked around. If something else comes out black, try switching the capture engine to WGC in Settings (設定).
Is the app available in English?
Yes — since v1.1.2. The app starts in Japanese the first time; open Settings → 言語 / Language and pick English (no restart needed). This guide still lists the Japanese labels next to each step so you can find your way before switching.
What are the limits of the free edition?
Everything described on this page — all the capture modes, the annotation tools, and the library — works in the free edition, and saved images never get a watermark. The Pro edition (a one-time purchase) adds device-to-device sync, full-text search of the text inside your images, and batch renaming. You can try every Pro feature free for 14 days from Settings (設定) → Edition (エディション). That covers features. There is also a line on how you use it: the free edition is for personal use, and using Capture Core for work requires a Pro license — that includes use inside a company or organisation, work as a sole trader or freelancer, and anything you deliver or sell.
10. Next steps
That covers everyday screenshot work. Beyond it sit the Pro features: device-to-device sync that never touches a cloud, full-text search across the words inside your images, and file names taken from the playback position of whatever you are watching. All of them can be tried free for 14 days from Settings (設定) → Edition (エディション), with nothing but an email address.
What changed in each version is published in the release notes. If something does not work, please get in touch — it reaches the developers directly.